
Create a FB biz page
HOW TO

“A wide audience still use Facebook”
If your DA use Facebook you need to have a FB biz page. Some businesses absolutely THRIVE on Facebook, & unless you have one you just won’t know!
The easy thing about this is, all you have to do is switch across the bar when you are about to send an Insta post to your feed - It goes straight to your FB page instantly ;)
1. Log in to your personal Facebook page
2. Top right corner is a + sign, click this
3. Click Page

4. Enter page name – This is usually your business or brand’s name. You want people to recognize you straight away, so I would recommend using the same name throughout all platforms – remember consistency is key!
5. Enter category – You can choose up to 3 if you need, but make sure it’s accurate to what you do. Some examples are community, travel company, home décor, boutique store, fitness trainer, personal coach.
6. Enter a description – This can be changed later so don’t panic if you don’t know exactly what it is.
That’s your Facebook page created.

Now let’s fill it out….
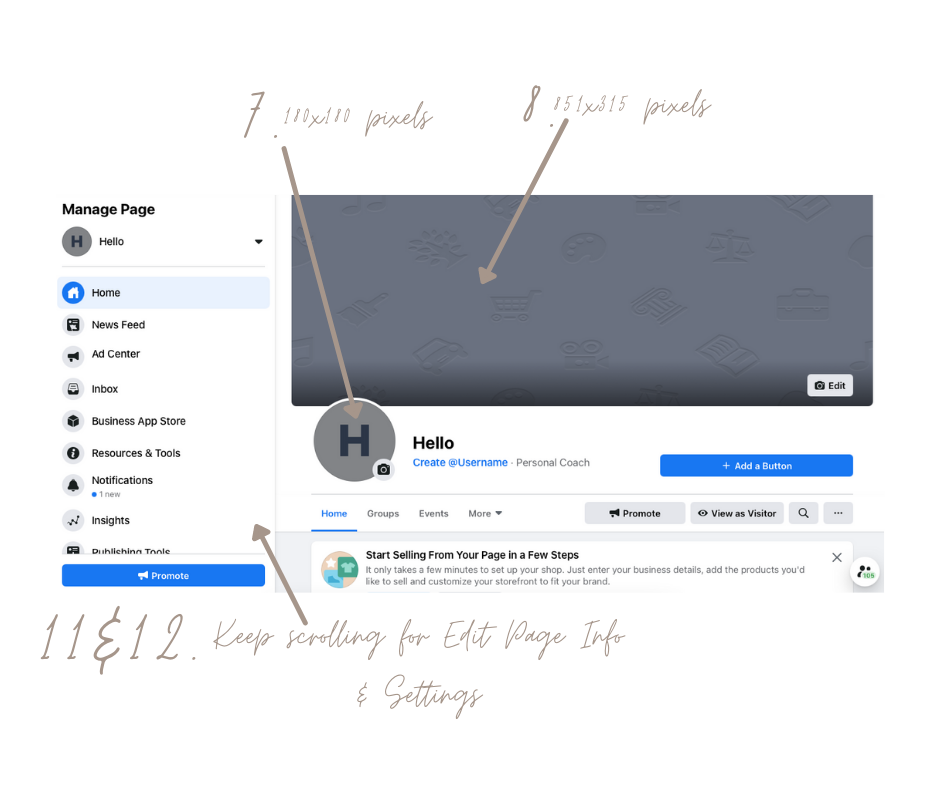
7. Start by adding a profile photo, this is the small one on the left-hand side. The size needed is 180x180 pixels.
8. Add a cover photo, this is the long one across the top of your page. The size needed is 851x315 pixels.
9. If you are uploading text or your logo for either of the above, you will get a clearer image if you upload it as a PNG file (to do this open your image, click file, click export, click format, and then the PNG option)
10. Create your username – This is important as it needs to be short, sweet and people need to remember it. When someone types this in the search box at the top of their Facebook, you will come up straight away.
11. On the Manage Page section on the left-hand side, scroll down to Edit Page Info, here you can fill in lots like your website, location, description, contact details.
12. Settings – Go through each one of these options and select what’s appropriate.
13. Templates and Tabs – This is where you decide what order things are seen on your page, so if you’d like your photos and reviews seen first and then your posts and videos after.
14. Notifications – Important to do, as this can either be really annoying if all are kept selected or you will miss crucial things by not selecting them.
15. Page Roles – This is where you add either a collaborative partner or a virtual assistant who is managing your page for you.
16. Instagram – Connect your business Instagram account, once connected on your Instagram too your Instagram posts will automatically be posted to your Facebook page = No double posting = win-win !

Once you have all the above points completed, this is your page ready and raring to go!
*P.S. I highly recommend adding the 2 step verification, from somebody who has had major troubles with their security before, it’s one of the first things I ALWAYS set up now.
If there is a point I am missing on here or if you are struggling to find how to do anything, message me & I will tell you how & also add it to this How To so it can benefit others.